sábado, 30 de outubro de 2010

This weekend I managed to borrow a laser from a local contractor. Despite the terrible weather outside with strong winds and intense rain, thanks to the polietilene panels I installed on the shop I've been able to keep working without any problems.
Today I ligned up both main hull halves and glued the trasom, aft and forward bunk bulkheads. Tomorrow I plan to complete this stage by placing the forward and main hatch bulkheads as well as the flanges for the forward and cockpit panels and the cabin setee.
This way I'll be done with the laser and can return it to the contractor.


segunda-feira, 25 de outubro de 2010

Setting up materials for vacum bagging. Peel ply, bottom layer glass, foam ( not shown), top layer glass, peel ply, release film, breather fabric , vacuum film and sealing tape. Too bad most of this stuff will go straight to the trash bin! With this process it's possible to get excellent laminates.
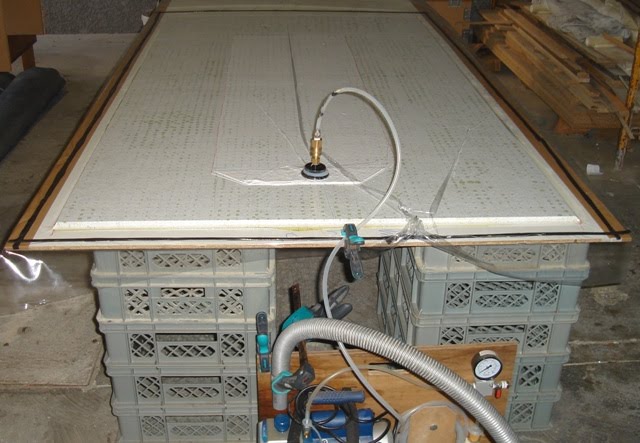
This is the largest vacuum laminate I did so far measuring 1.08 x 2,60 m! With this size it's possible to cut out the forward bunk top and aft cabin floor and still get some off cuts large enough for smaller panels.
I'm using the vacuum cleaner tube on the venting outlet of the vacuum pump to avoid getting oil mist flying around the shop which could compromise resin bonding if it where to set on surfaces subject to future laminations. Had I known this I would have chosen an oiless vacuum pump. This is particularly severe if you don't get a full vacuum and too much air flows through the pump.


Starboard hull half sanded and ready for next stage. I was able to get a laminate nearly free of any imperfections without using any plastic film as many other builders use. It takes some practice to get the hang of it but after a while it actually becomes a lot easier than one could expect.


I planed to have some friends over to help me place the port hull half in position, but couldn't wait for the weekend so decided to do it myself with the help of some straps hung up on the ceiling. I didn't count how many times I went up and down the ladder but it must have been close to a hundred times!


After a few hours the hull is finaly in place. I'm very pleased with the alignment of the two hulls.


It's beggining to look like a boat, but still a long way to go.


Bow trimmed and ready to install the bow web.


quinta-feira, 14 de outubro de 2010

Update

Beams, folding system and beam mounts have arrived from New Zealand. Took a quick look at the stuff and stocked it away for later. Still have a lot of work to do before the project is ready for the setting up the beams. Not much I hope!
In the meantime caught a small snake ( Montpelier rat snake) in my backyard and decided to make it my project "partner". The little thing is quite picky as far as eating goes. After trying all kinds of normal food (live and dead) I only convinced the snake to eat lizards. So I set up a food chain scheme with glue to catch flyes first, then lizards and it seems to have worked fine.

Anchor well on the way. It's finished and set aside for instalation.


Getting ready for the daggerboard. I built a custom table to make working around the blank as easy as possible.


Building up the thickness ( 50mm!).


Blank ready for HD inserts


Some drawing board work.

Routing...routing and more routing!

Daggerboard routed with the core insert. Looking good!


I decided to apply a first layer of carbon UD to avoid any possible warping due to uneven exotherm on the two sides during lamination.
The Daggerboard has been by far the most complex single component that I've made so far. It requires a huge amount of concentration during the whole process, especialy when tracing and routing the isometrics. In fact I ended up inverting the foil on the second side which forced me to reinsert a plug and repeat the routing process. The putty used on the one side induced a warp in the board. Fortunately I managed to apply counter warp and "froze" the shape with some carbon UD. It's not the best daggerboard in the world but it will do just fine. After all I spent nearly two weeks around this part and wasn't in the mood to let the whole work go down the drain.
I don't recommend this process to anyone coming behind. Take a look at other solutions or have it CNC'd. It will save you a lot of trouble, believe me!
Anyway, if you really want to claim for yourself the statute of boat builder, you've got to negociate with one of these foils!

Rudder, Daggerboard and Case waiting for lamination.


Winter is setting in, so I decided to close up the side of the working space. This way I hope it gets warm and dry enough to keep me going through the winter. I expect to glue both may hull halves and laminate the outside skin in three to four weeks time, so most of the remaining work can be done under controled environment.

Job done! It looks pretty good and I can already feel the improved confort.


Here the second main hull half is progressing at good speed. Tomorrow I intend to finish the remaining interior bulkheads and panels to get the hull ready for joining.
Weather has been fantastic so far . Let's hope it holds for another week or so!